Importing a File

Imports
PCR-360 allows Users to Import information into the application as needed. The bottom of this page has a list of all the Import types that can be used. Individual pages handle the specific logic of any given Import. This page goes over the more general information related to Imports.
Notes
- The Import process CANNOT DELETE records.
- In a Delimited file, the import treats the number of columns as one MORE than the number of commas separating values.
- For example, if there is a CSV line with three commas, there will be 4 values. The numbering of the fields is Zero-Based, so the indexes will be: 0,1,2,3 in the field mapping or Conditional Logic.
- In a Fixed Width file, you will define the fields by Position and Length. The field positions are Zero-Based. So in a file where a field starts on the 1st character of a line, the Position is entered as 0. If the field starts on the 10th character, the Position is 9.
- To create a GLA Path, the value stored in the configuration option GLA_IMPORT_CONCATENATOR should be used as a concatenator.
- The Default Value = " > ".
- To create any other Hierarchy Path, the value stored in the configuration option HIERARCHYPATH_CONCATENATOR should be used as a concatenator.
- The Default Value = " > ".
- When running a Charge Import don't:
- run a GLA Replace
- Bulk Update Services/Equipment
- When running a Cabling Import don't:
- When a File is Imported, PCR-360 records the User who uploaded it.
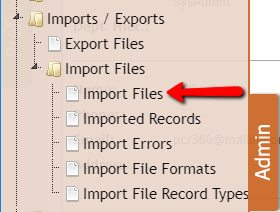
Use of HTML Tags Some fields within PCR-360 allow Users to input HTML tags to make displaying that information a richer experience for those that are expected to consume it. For more information on HTML tag usage, please see the wiki entry for it. After the format of the file to be imported has been defined, as described in the 'Import File Formats' article, the User can upload the file into the PCR-360 application. Navigate to Admin>Imports/Exports>Import Files>Import Files. From the Grid, click the From the Import File Upload form, the User must select an 'Import File Format' from a list of items on the Import File Formats grid. Before uploading, it is recommended that the User tests the upload by clicking the The User can also choose to upload the file by clicking on the Uploading Files
![]() button.
button. 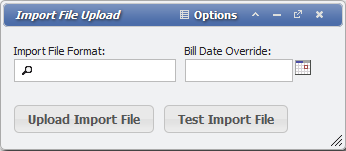
![]() and selecting the appropriate file to be imported from the user's computer.
and selecting the appropriate file to be imported from the user's computer.![]() button. The User is then prompted to select the appropriate file to be imported from their computer. When a file is selected for upload, the upload process begins immediately. After the file is uploaded it will appear in the Imported Files grid in an unprocessed state. The import process will begin in the background within a couple of minutes.
button. The User is then prompted to select the appropriate file to be imported from their computer. When a file is selected for upload, the upload process begins immediately. After the file is uploaded it will appear in the Imported Files grid in an unprocessed state. The import process will begin in the background within a couple of minutes.
Importing Files with FTP
When a file is FTPed to the import directory specified by the IMPORT_FILES_PATH configuration option, the following steps are done to that file:
- The system compares the filename to the File Import Formats table to see if it matches any of the imports.
- If it does not match, the file will be left in the directory. There will be no entry in the Import Files grid.
- If it does match, an entry into the Import Files grid will be created, keyed by the filename and saved with a hash calculated from the file content and a status of Incomplete.
- Within another minute, the hash will be re-calculated and compared with the previous value to see if it has changed. This might happen if a large file was not finished uploading on the previous check. If the hash changes, the new hash is saved and the file is checked in another minute. When the hash stays the same value three checks in a row, the file is updated to a status of Complete.
- When the file is Complete, the final hash value is checked in the Import Files grid to see if the file is a duplicate of a previous file. The File Import Format has an option to specify if duplicate files are allowed. If the file is a duplicate and the toggle is not set to allow duplicates, the status is marked with an error, and the file is not processed further.
- The file is then compressed with gzip and moved to the archive directory. Within a minute, the actual import process event will find and process the file from the archive directory.
Deleting Imported Files
The following imported files can be deleted:
- Files With Error Descriptions
- Test Files
- Unbilled:
- Call imports
- Usage imports
- Service Charge imports that only did New Adds, no Updates
- GLA Charge imports that only did New Adds, no Updates
To delete Files that have been imported, go to Admin > Imports / Exports / Import Files > Import Files.
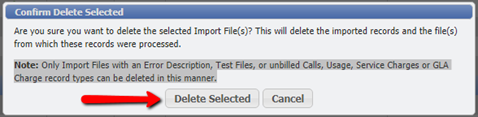
Once there, select the desired files to be deleted, and click 'Delete Selected' from the Import Files Grid.

A confirmation dialogue will appear, alerting the user what types of files can be deleted.
RECID vs. ROW ID
The usage of RECID or ROW ID is for clarity about what the RECID or ROW ID represents. ROW IDs - Row Identification Numbers (ROW IDs) are unique IDs to the row of data in the grid they're assigned to. Some grids do not have a RECID but all grids have ROW IDs. RECIDs - Record Identification Numbers (RECIDs) are unique IDs for records within a given table. When a grid references a specific record from a table, the Table Name is usually the column name of the RECID that the grid is referencing. There are several reasons both are used.
Errors

The Error Description on the Import Files Grid is only populated when the Import Process encounters an Error that requires the entire file to cease being processed. Errors on the Import Files Grid should be a rare occurrence, usually being empty files or when a file does not match up with the expected format.
The Imported Records/Import Errors Grids will display any Errors on individual line items that triggered an error in the process but did not require the entire process to stop. It is recommended that after Importing a File, one of these two Grids should be checked to confirm nothing unexpected went wrong within the File.
Note: If you ever see an error on the Import Files grid that you do not understand, it should be reported to PCR immediately so that we can dig into the issue further, as that might be indicative of a bug within the Import Process.
A quick check that could be done on the Import Files Grid, to see if the Import File might have had an error, would be to check the "Record Count" and "Added Count". The "Record Count" indicated how many lines the File has that will be processed, while the "Added Count" indicates how many records were successfully saved to the system.
Note: Imports like Calls and Usage, are expected to add so many records to the system that these types of Imports do not add details to the Imported Records Grid. These Imports have their own Details and Errors Grids under View/Report for Billing.
Errors in Test Mode
When you run the Import in Test mode, there are two kinds of errors that do not report.
- If the Save to the database failed for an unexpected reason, the errors do not generate. The Import can’t detect these errors until the save is attempted, which does not happen in Test mode.
- User Defined Field (UDF) Import Save logic is done after the Save and is only done for non-test Imports. For this reason, any errors processing the UDF values will not be reported in Test Mode.
Errors that cause the import to Abort
If one of the following errors happens, the import process will abort. Because each successful import line is always committed, if the import process aborts halfway through a file, the result is the first half of the file will still be processed and committed.
- Database error
- SQL error
- Uploaded file is Empty
Handling Errors
When an Error status shows on the Imports grid the reprocess option should be used. For some imports (Calls, Usage, GLA Charges and Service Charges), this cleans-up any commits made during the previous attempts that would be problematic and reattempts the Import. It is not recommended to re-upload files, due to the risk of the creation of duplicate records. This is particularly important on all Charges Imports. If you need to make a change to the file and re-upload instead of reprocessing, make sure to remove previously imported lines.
The following Imports Formats do not update existing records and potentially could create duplicates:
The following Imports Formats are typically used to create new records but can be used to update as well:
Other Common Errors
There are certain common errors that do not cause the import to abort. These errors are common to all Import Formats.
- Value not present in lists table
- Error reading column using format mask
- Column defined as a number contains non-numeric data
- Column position not present in line
- Column index not present in line
There are other errors that are specific to the import types, these are listed on the individual import pages.
Related content
Help Desk Portal - Email: help@pcr.com - Phone: 616.259.9242