Crystal Reports (Deprecated)
Deprecated: Please See Custom Reports
License
The Crystal Reports module requires a separate license to be installed before key parts of the functionality are available. This license is disabled by default. Please contact PCR to obtain a license.
Manage Reports

Crystal Reports can be managed and associated by Users of PCR-360. These reports can be associated with individual Users and on Forms throughout the application.
Uploading Reports
To upload a new report:
- Go to Admin > Crystal Reports > Upload Reports
- Click Upload File(s)
- Choose the report from your PC and click Open. Remember that only valid .rpt files will be allowed to upload to the PCR-360 server.
- Click Done

Edit Selected
The 'Edit Selected' button  will let a User modify a report.
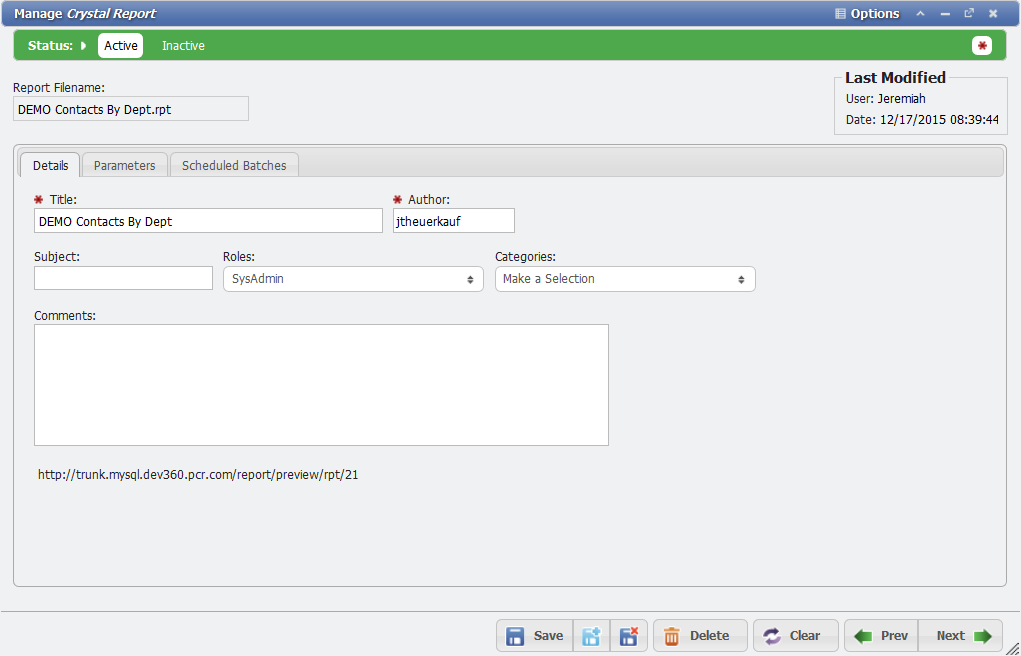
From the 'Details' tab, the User can see the details of an uploaded .rpt file. The 'Title' and 'Author' fields will load automatically when the .rpt file is uploaded. From here, the SysAdmin can determine which roles to add Roles to the report to limit what Users have access to the report(s), add categories for sorting, and/or add comments.
The 'Parameters' tab will show the User all of the parameters that were associated with the report on 'Upload' and how those parameters will appear to Users. Users can edit the description, sort order (if there are multiple parameters), and whether the Parameter is Required or even Displayed. If a Parameter is a required field, it must be 'Displayed'.
The 'Scheduled Batches' tab includes the same functionality as the 'Create Batch ' button on the Manage Reports grid.
Create Batch
Batches are designed to generate a set of Historical Reports in the application. To do that the batch needs a data set to use in generating the reports. The Filter SQL is used to define the data that you want passed to the Report. Create Batch will allow the User to set up a Batch with optional Notifications for Users and Schedule reports. Select a report to create a batch. Click the 'Create Batch' button  to open the Report Batch Process Form.
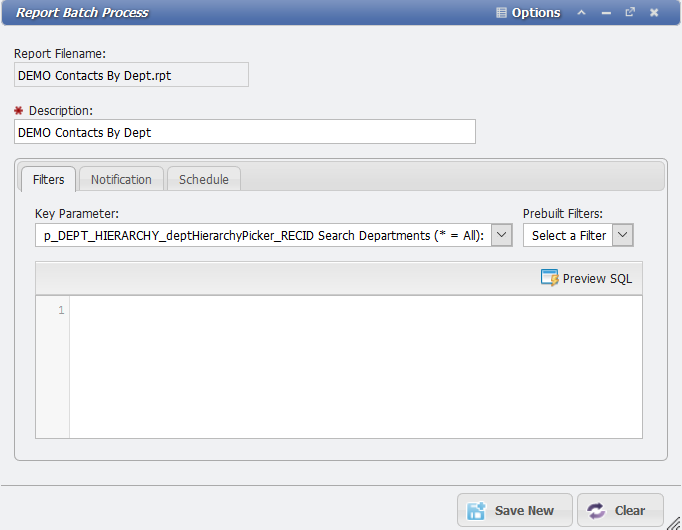
There are three tabs on the Report Batch Process form.
The 'Filters' tab allows the User to determine which User the report will be assigned to. An Admin can select to use a 'Prebuilt Filter' The Batch Filter grid is where the 'Prebuilt Filters' are created and stored, and a complete guide to creating these filters is available there. If the User doesn't want to use the Prebuilt Filters, then new filters can be created from scratch.
The 'Notification' tab will send the User an Email with a Subject and Message that the User determines. There is an option to attach the report to the email that will be generated in one of any number of formats that the User selects. The available formats available to the User are PDF, a Word Document, Excel file, Rich Text File (.rtf), a plain text file, CSV file, Tab Delimited, or XML file.
The 'Scheduled Batches' tab can set the Batch that is selected to run on a schedule of the User's choosing. The default option is 'Start Batch Immediately', but this can be deselected by the User to set up a Scheduled Batch process. The optional scheduling can be set for typical cyclical Daily, Weekly, Monthly, Quarterly, or Yearly cycles. Additionally, the User can also select a one time run if they so choose.
View Report
The 'View Report' button will provide the User with a preview of the report. Once the report is generated it can be 'Saved to History', 'Exported', or 'Emailed'.
Save to History
The 'Save to History' button ![]() will create a report that can be accessed by the User. It is assigned to the Historical Reports where it can be accessed by the User(s) it is assigned to.
will create a report that can be accessed by the User. It is assigned to the Historical Reports where it can be accessed by the User(s) it is assigned to.
Navigate to Reporting > Crystal Reports > Historical Reports in order to view any 'Saved' reports.
Export
The 'Export' button  will create a file of the report that a User can save to a computer and use as they would any other file. The available formats available to the User are PDF, a Word Document, Excel file, Rich Text File (.rtf), a plain text file, CSV file, Tab Delimited, or XML file.
The 'Email' button  will send the report via external email to whatever Email(s) is selected. The User can choose to include an attachment of one of the valid file formats in the Email that is sent out.
Assigning Reports
To assign a report to a PCR-360 form
- Navigate to the desired form. For example, Main > Service Desk > Orders

- Click the Options menu
 , then Manage Reports
 - Click the Add button.
- Choose the report you want from the Upload list.
- Click the Save New button.
- You will need to close the Manage Report Links screen and the Add New Service Order screen.
- Open an existing Service Order. On the title bar of the screen next to Options, you should now have a Reports menu option.

- Click Report and then select your report to View the report. You can have multiple reports per form.
Batch Filter
The Batch Filter SQL is used to define the data that you want passed to the Report. Any Filters that are built here can be used in the 'Prebuilt Filter' drop down on the Report Batch Process form. To access them, use the 'Create Batch' button or 'Scheduled Batches' tab of the Manage Crystal Report. The grid will reflect the name of the Batch Filter and the 'Filter SQL'.
Add
This will add a User defined Filter to the 'Prebuilt Filters' drop down on the 'Filters' tab in the Create Batch form. There are only two required fields for this operation. The 'Name' of the Batch Filter that is desired serves as a descriptor that can be easily searched for and the actual SQL of the filter.
Batch Filter SQL must contain 2 specific columns in the select: KEY*and*ASSIGN.
- KEY - this column is the parameter that is passed to each Crystal Report when they are executed.
- ASSIGN - this parameter is assumed to contain a USERS table RECID. It is used when assigning the Saved Data report to specific User in the Historical Report table.
After writing the SQL the User can click the  button.
For example, to generate a report for each Coordinator in the system the query might look like this:
SELECT U.RECID as ASSIGN, C.RECID as `KEY`
FROM CONTACTS C
INNER JOIN USERS U
ON C.RECID = U.CONTACTS_RECID
INNER JOIN CONTACTS_TYPES CT
ON C.RECID = CT.CONTACTS_RECID
INNER JOIN LISTS L
ON L.RECID = CT.CONTACT_TYPE_LISTS_RECID
WHERE L.CODE = 'COORDINATOR'
Delete Selected
The 'Delete Selected' button  will remove any Batch Filters that the User has created.
Related content
Help Desk Portal - Email: help@pcr.com - Phone: 616.259.9242