Reporting on Services
Navigate to the Reporting section by clicking on the 'Reporting' icon in the 'Main' tab. Click on the node labeled 'Services' (see image above). Click on any listed node to see a query-only Reporting grid for the corresponding Services entry type. (See images below)
Reporting functionality for Services entries is included in the Reporting section for the sake of convenience, as users will likely generate these queries/Reports on a frequent basis. These grids, which also appear in the View/Report section of the Services, cannot be modified.
In terms of Reporting, all of the functionalities common to all other grids apply equally to these Reporting grids. For instance, Users can filter items on the grid, sort by column, and print grid reports. For more information on grid functionality, see the Getting Started: Critical Interfaces section entitled 'The Grid'.
Services Reports
Services & Equipment GLA
This Report is shared with Inventory and includes both Services and Equipment with their associated GLA.
This Report can be used for verifying that the correct percentages are being used on GLA's.
The Services & Equipment GLA Report is also useful in seeing in real-time what Services and Equipment are associated with a particular GLA and verifying that the associations are correct.
Services & Equipment Location
This Report is shared with Inventory and includes both Services and Equipment with their Location.
This Report useful in seeing where Services and Equipment are located and verifying that they are actually in the correct Location and if there is a need to move a Service and/or Equipment to a different Location.
This Report also gives a User the ability to see what the Status is on a specific piece of Equipment and if it is the correct Status.
Services Locations
This Report is shared with Inventory and includes Services with their Location.
This Report can also show what Services will be sent to the E911 export. The E911 information is located in the Report 911 column.
The Report 911 column is turned off by default. To turn the column on, navigate to the Gear Icon at the top right of the Services Location Grid. In the Arrange Columns section, check the 'Report 911' flag.
The Enhance 911 (E911) service creates and exports a file for Reporting 911 Services.
The reason to use E911 is that it provides the caller's location directly to the 911 dispatchers.
This Report can be used to see which locations are E911 locations and which ones are not for the purposes of changing which Locations actually need E911 and which ones do not.
All Services
This Report displays services of all types.
This Report allows the User to view all of the Services in a company and sort them by various queries such as a particular Service Id, Status, Service License Agreements (SLA's), etc.
A User can utilize this Report to see how many of a particular type of Service a company has and determine if there is a need to add more of that Service or delete some of those Services.
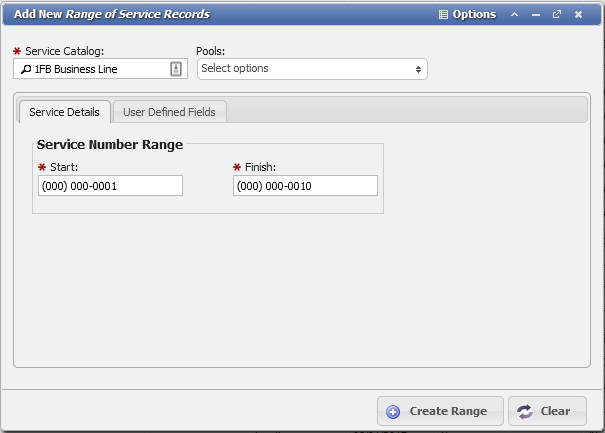
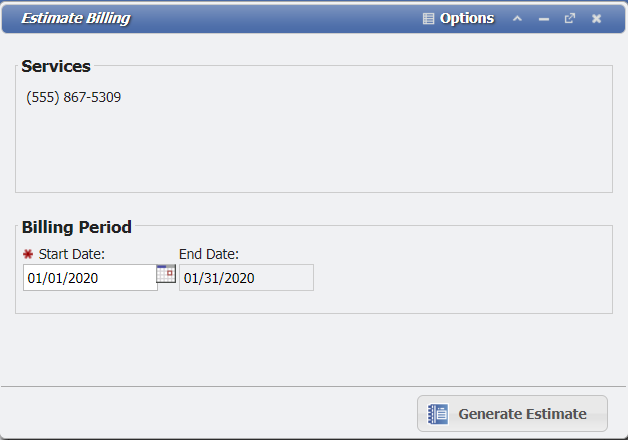
The following is generalized functionality that can appear on various Services grids, based on how those Services behave. Most commonly this functionality refers to Phone, Trunk, Authorization Code and Other Services. The Aging Process in PCR-360 is an automated data removal process that will delete old information from Inactive Services. Examples of data that will be removed are the Owner, Service Host, and Location fields. Some information can be deleted or remain on the Service for future use on the Service ID. An example is the User Defined Fields (UDFs) can have the option to have their data persist or be scrubbed on Aging with the Aging Persist flag. Another example is the Configuration Option DELETE_CHARGES_DURING_AGING which will allow you to delete old Charges or leave them on the Service. Sometimes it can be necessary to manually "Age" a Service to make it active again. This process is normally handled automatically by either the setting on the Service Catalog or the Tenant Management Aging fields. To manually Age a Service select the Service and click the button. There are a few requirements before a Service can be aged manually: The History Report of a Service will still show all the old data of the Service. Once a Service has been "Aged" successfully, PCR-360 will change the status to available so that the Service ID can be reused on Service Orders for a new Owner. There may occur a situation where a Service is desired to no longer be available after it has been "Aged" (such as if the number was receiving harassing phone calls). The best way to handle this is to set the Service to a Service Pool with Services that are designated "Do Not Use". By adding the Service to this Pool, the Service will be designated to not be used simply by being in the "Do Not Use" Pool. Additionally, the Administrator can add a UDF that will persist through Aging as well, with the flag "Verify Field Data" set to call attention to UDF. Using this method provides a backstop to the need to not use the Service since a Remark could easily be overlooked when re-assigning the Service with an Add Action. Users can add Services in bulk by clicking on the button located on the Grid Toolbar above the Services grid. In the window, click the Search Icon in the 'Service Type' field and select a type from the list, enter a range of phone numbers to a 'Service Type', and click the button. Each phone number included within the specified range will appear as a separate Service in the Services grid. When a User selects a Service and clicks the button on the Grid, they will open the Estimate Billing form. From this Form, a User can generate an estimation of expected Charges over a provided Billing Period, by clicking the button.Age Selected
Adding a Range of Services
Estimate Billing
.Reporting on Services v2018.1
.Reporting on Services v2019.3
.Reporting on Services v2022.2
.Reporting on Services v2.1.4.7
Related content
Help Desk Portal - Email: help@pcr.com - Phone: 616.259.9242


