Inventory
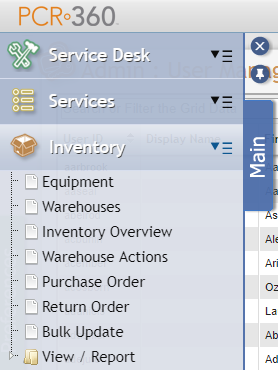
The Inventory module offers Users unprecedented access and insight into the Equipment currently owned or in use by their organization. In this section, a User can locate or transfer any piece of available Equipment and establish a strict protocol for the Equipment's usage. A User can also create new Equipment types and categories from the Equipment Catalog.
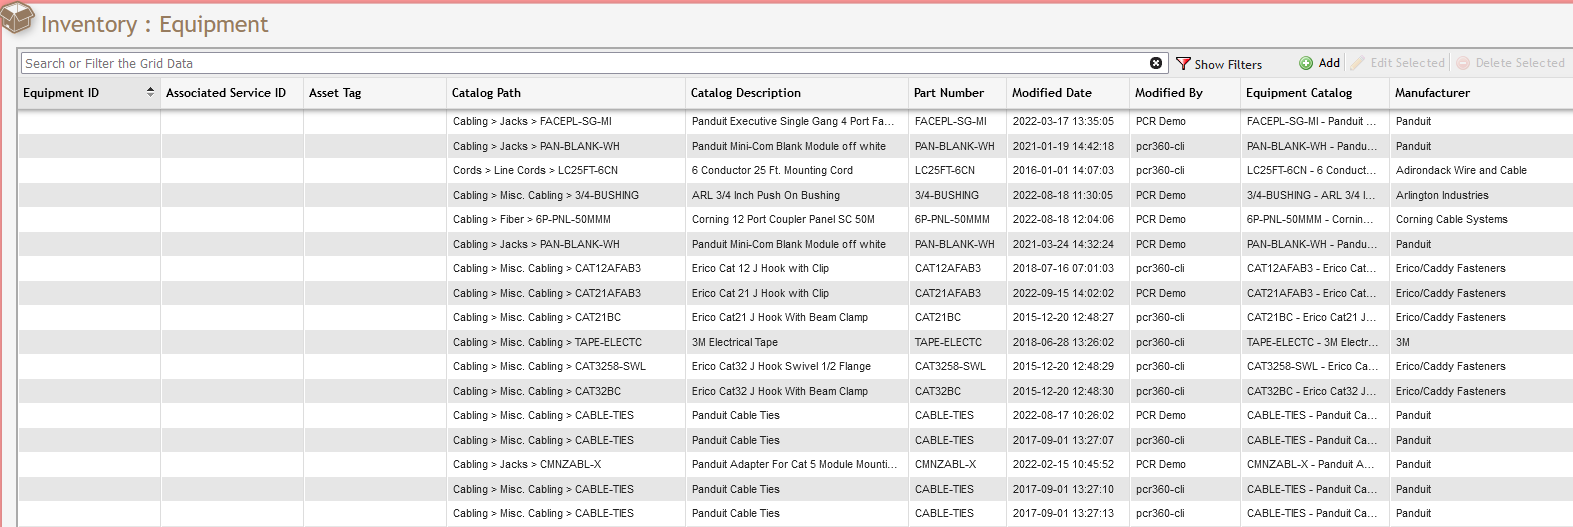
Inventory:Equipment grid
Double-click any piece of Equipment and see its exact Location, Owner or primary point of Contact, detailed billing protocol, specific identification information, a detailed description of its usage in the network, and any Remarks or important information that accompany it.
Inventory:Warehouses grid
Double-click any Warehouse and see its exact Location and type, each piece of Equipment it houses, and a list of Contacts associated with the facility and its Equipment.
Far more than a simple monitoring tool, the Inventory function also encourages Users to interact with their Equipment. Users can order new Equipment to a Warehouse, initiate Bulk Transfers of Equipment between storage facilities, and even set default Reorder points to ensure a fully-stocked Inventory across a large network of Locations.
Inventory Overview grid
See a broad overview of Equipment on hand and where it is located. From here, actions like ordering more Equipment, Bulk Transfers, and Reorder Thresholds can be set.
Inventory:Warehouse Actions grid
Select multiple Equipment to Stage, Pick Up, or Return to a Warehouse.
Inventory:Purchase Order grid
Create and manage Purchase Orders from specific Vendors in a Warehouse.
Inventory:Return Order grid
Create and manage Return Orders from a Vendor or a Warehouse for returned Equipment.
Inventory:Bulk Update grid
Update multiple pieces of Equipment simultaneously.
View/Report sub folders
- Inventory Counts
- Warehouse Point in Time
- Warehouse Bulk History
- Equipment & Services GLA
- Equipment & Services Location
How to remove Equipment from Inventory Counts
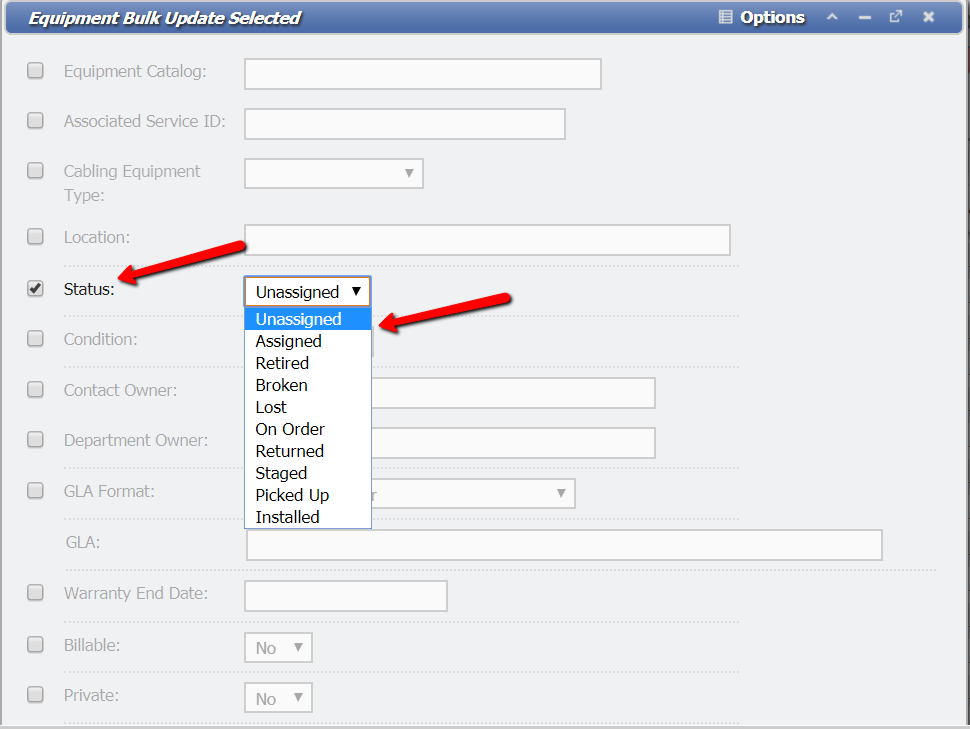
When there is a need to remove Equipment from the On Hand amount in the Warehouse, Bulk Update can be used to accomplish this task. In order to remove Equipment from the On Hand amount, an "Unavailable" Status must be chosen. The Status dropdown for Bulk Update that contains the Unavailable Statuses is found hereafter either the
- Retired
- Broken
- Lost
- On Order
- Returned
- Staged
- Picked Up
- Installed
This is useful if there is ever a massive recall of a specific piece of Equipment or if a job or an installation requires a large amount of Equipment (i.e. setting up a new facility). We urge extreme caution when using Bulk Update to remove Equipment from Inventory. Bulk Updates cannot be undone, so errors (updating too much or wrong type of Equipment) will have adverse effects on Inventory tracking.
To verify if you were successfully able to remove Equipment from Inventory Counts, please see the Reporting on Inventory Wiki page.
For further information about the overall process of Bulk Update and its functionality, see the Bulk Update Wiki page.
How to view the history of a specific piece of Equipment
There are two recommended ways to view the history of a specific piece of 'Equipment'. Both can be performed from "Main > Inventory > Equipment", and selecting the desired Equipment.
- Using the Activity tab on Equipment to locate Service Orders related to the Equipment, and then looking in the Service Desk Equipment tab on those Service Desk Items.
Viewing the History Report for Equipment, by selecting the 'Options' menu and clicking on 'History Report.'
One of the most common details needed to be looked up about a piece of Equipment is where the Equipment originated from. The Service Desk Equipment tab will only give this information if the Equipment was added as a part of a Service Desk Add Action. The History Report will maintain the full history of the Equipment.
Inventory Approaching Reorder
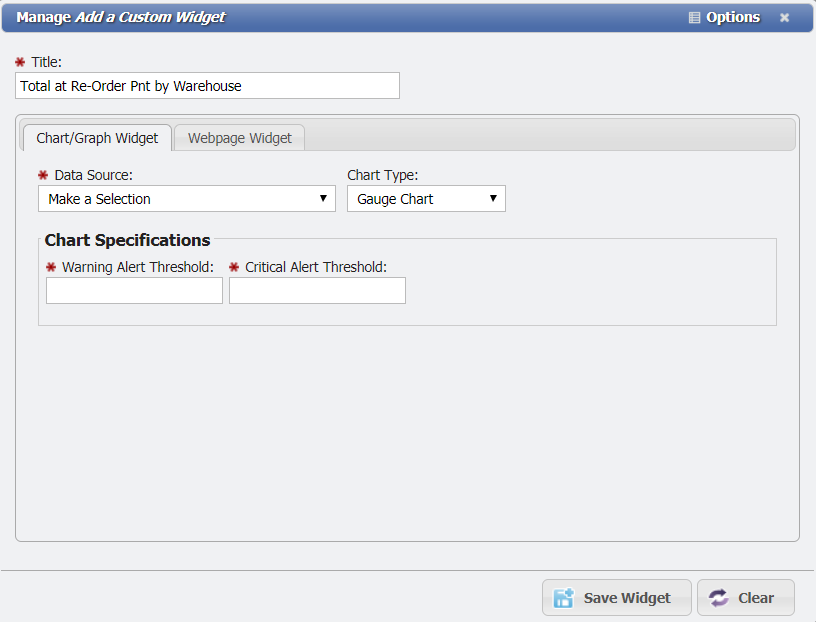
To view items in inventory which are approaching their reorder point use the “Item at Re-Order Pnt by Warehouse” widget.
You may add this widget to your homepage or a dashboard page by following these steps:
1. Click the "Configure" button at the top of the page and then click the button.
2. Enter a title for the widget or leave as blank (the title, if empty, will be given the name of the widget).
3. Under the “Chart/Graph Widget” tab select the “Total at Re-Order Pnt by Warehouse” widget under the “Data Source” drop-down.
4. Select a warehouse for the widget to watch and enter in the reorder threshold, warning alert threshold, and critical alert threshold fields.
- The“reorder threshold” is the point at which the inventory is flagged as needing to be reordered.
- The “Warning Alert Threshold” will trigger a warning alert for the widget if the amount of items within the reorder threshold exceed this amount.
- The “Critical Alert Threshold” will trigger a warning alert for the widget if the amount of items within the reorder threshold exceed this amount.
5. Click Save, the widget should appear on the dashboard page and indicate the percentage of inventory items that fall within the reorder threshold.
6. Click Done on the top of the page, to complete the process.
You can view and generate reports from the results of the widget by doing the following:
1. Click on the widget, this will bring up a grid displaying the selected results from the widget.
2. Click on the report button on the toolbar. You have the option of customizing the report by selecting the output (html, PDF, or CSV) and selecting to group the results by a specific column (optional). If the output is set to PDF or CSV you can also have the results sent to an e-mail address.
Related Pages:
Adding a New Warehouse
Barcode
Barcode Batches
Barcode Physical Inventory
Bulk Update on Inventory
Creating a new piece of Equipment
Editing an Existing Piece of Equipment
Editing Details of an Existing Warehouse
Equipment
How to remove Equipment from Inventory Counts
How to view the history of a specific piece of Equipment
Inventory Approaching Reorder
Inventory Overview
Inventory Tabs
.Inventory v2019.2
.Inventory v2020.3
.Inventory v2022.2
.Inventory v2.1.4.7
Managing Equipment in a Warehouse
Purchase Order
Return Order
Warehouse
Warehouse Actions
Help Desk Portal - Email: help@pcr.com - Phone: 616.259.9242


